
Create Your Own SSL Certificate Authority for Local HTTPS Development (Linux)
Table Of Content
- Introduction
- Why HTTPS Locally?
- Prerequisites
- Map the Host to the Nginx Service IP
- Nginx Configuration
- Step 1: Create a Root Certificate Authority
- Step 2: Adding the Root Certificate to Linux
- Step 3: Generate CA-Signed Certificates for Your Dev Sites
- Step 4: Configure Nginx to Use the SSL Certificate
- Step 5: Trust the Local Certificate Authority in Browsers
- Trust the Local CA in Chrome
- Trust the Local CA in Firefox
- Troubleshooting Common Issues
- Error: `Error: Self-Signed Certificate in Certificate Chain`
- Node.js (Express, NestJS, NextJS etc.)
- Python (Django, FastAPI etc.)
- Conclusion
Setting up HTTPS in a local development environment is crucial for simulating production-like scenarios, especially when dealing with secure communications. However, dealing with SSL certificates in local environments can be tricky. This guide walks you through the process of creating your own SSL Certificate Authority (CA) and using it to issue certificates for your local development sites.
The objective of this guide is to create a self-signed root certificate and use it to sign certificates for local development sites. This approach is suitable for local development environments and should not be used in production.
For this guide, we will use a dockerized crypto simulator trade application and set up a local secure https url
https://trade-sim.com. you can visit the hosted website here.
The app is based on microservice architecture that simulates trading of cryptocurrencies. It has Gateway, Crypto and Wallet services built with NestJS, a Task Scheduler service based on Django, a notification service based on FastAPI, a websocket service and a frontend built with NextJS.
We will go back to these services language/framework later when dealing with trusting the local Certificate Authority (CA) .
Introduction
In 2018, Google began encouraging the use of HTTPS encryption by marking sites without SSL certificates as "not secure" in Chrome. This move was widely embraced because it enhances the security of web traffic for both site owners and their visitors.
While services like Let’s Encrypt and its API have simplified the process of obtaining and installing SSL certificates for live sites, they don't offer much help for developers working in local environments. Generating a local SSL certificate for development purposes can be complex, and even with a self-signed certificate, you may still encounter privacy errors in browsers.
Why HTTPS Locally?
Why should you bother with HTTPS in a local development environment? Why not just use regular HTTP locally?
The answer is simple: to simulate production-like scenarios. When you develop a web application, you want to ensure that it behaves as expected in a production environment. This includes testing how it handles secure communications over HTTPS.
With this approch, you can catch issues related to mixed content, insecure requests, and other security-related problems early in the development process. This can save you time and effort by preventing issues from reaching production.
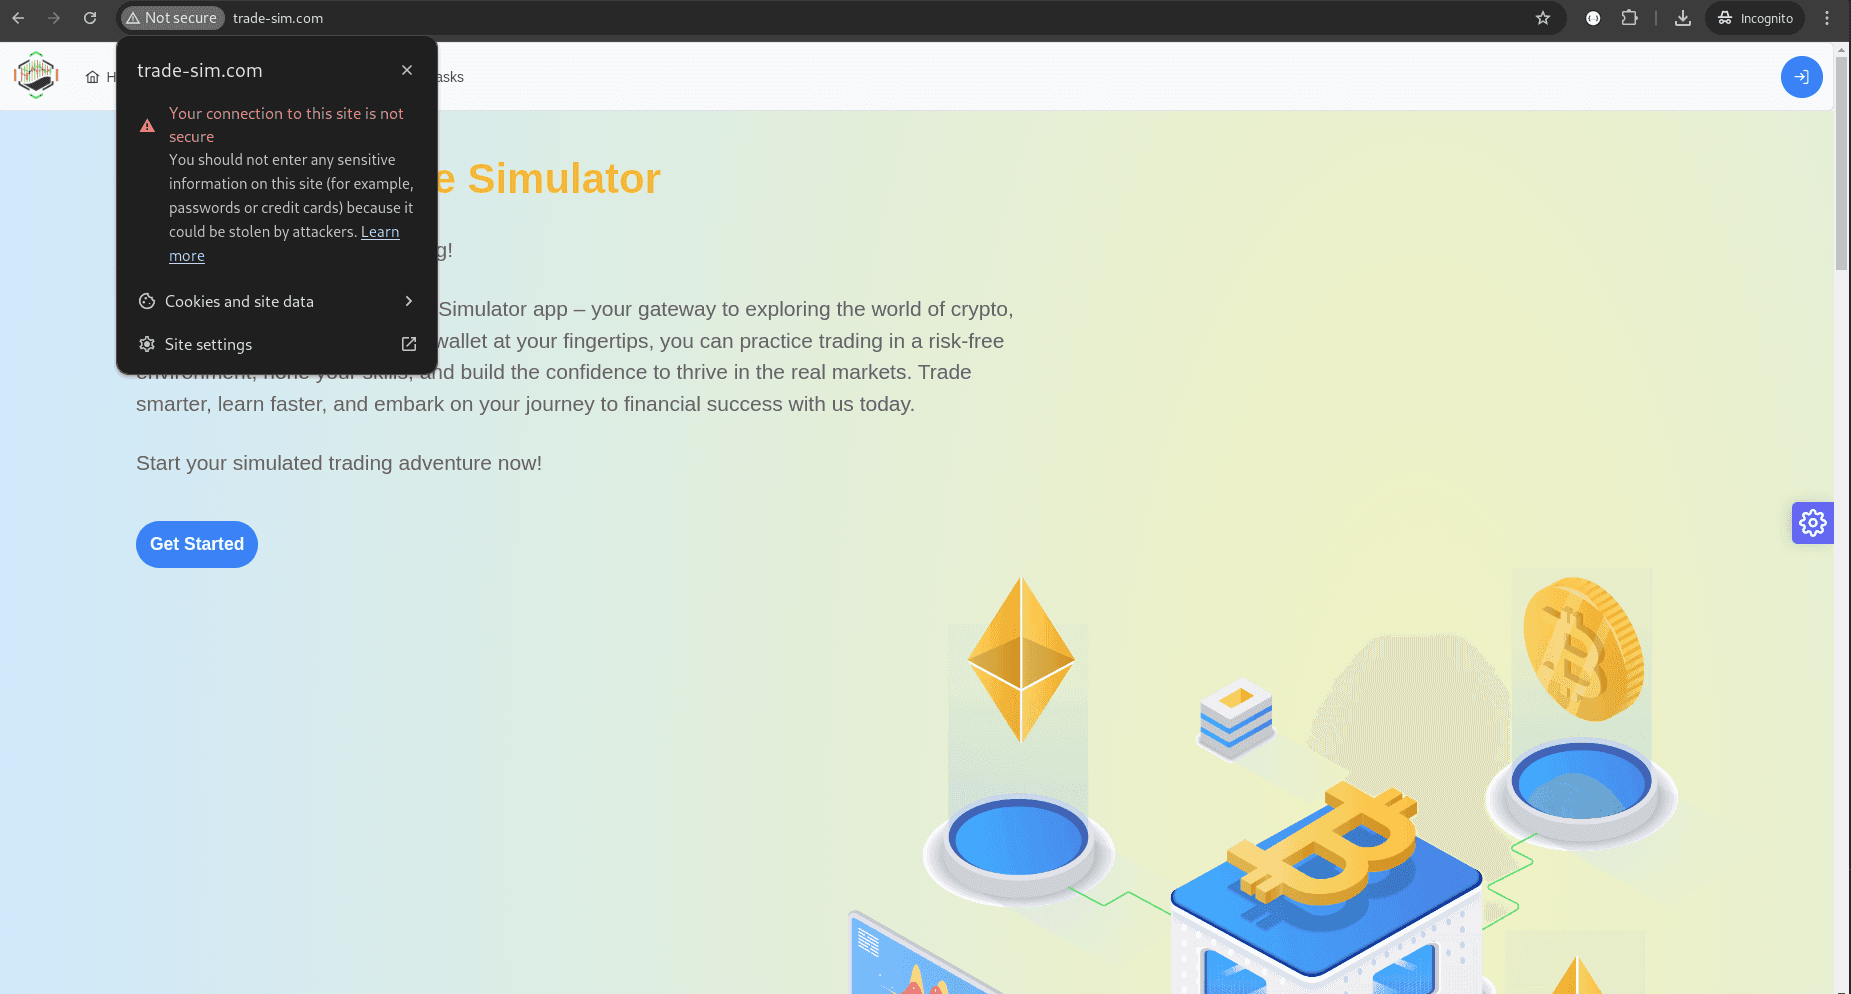
If you’ve ever tried to browse to a local site via HTTPS, which doesn’t have an SSL certificate configured, you’ve probably seen the following message in Chrome:
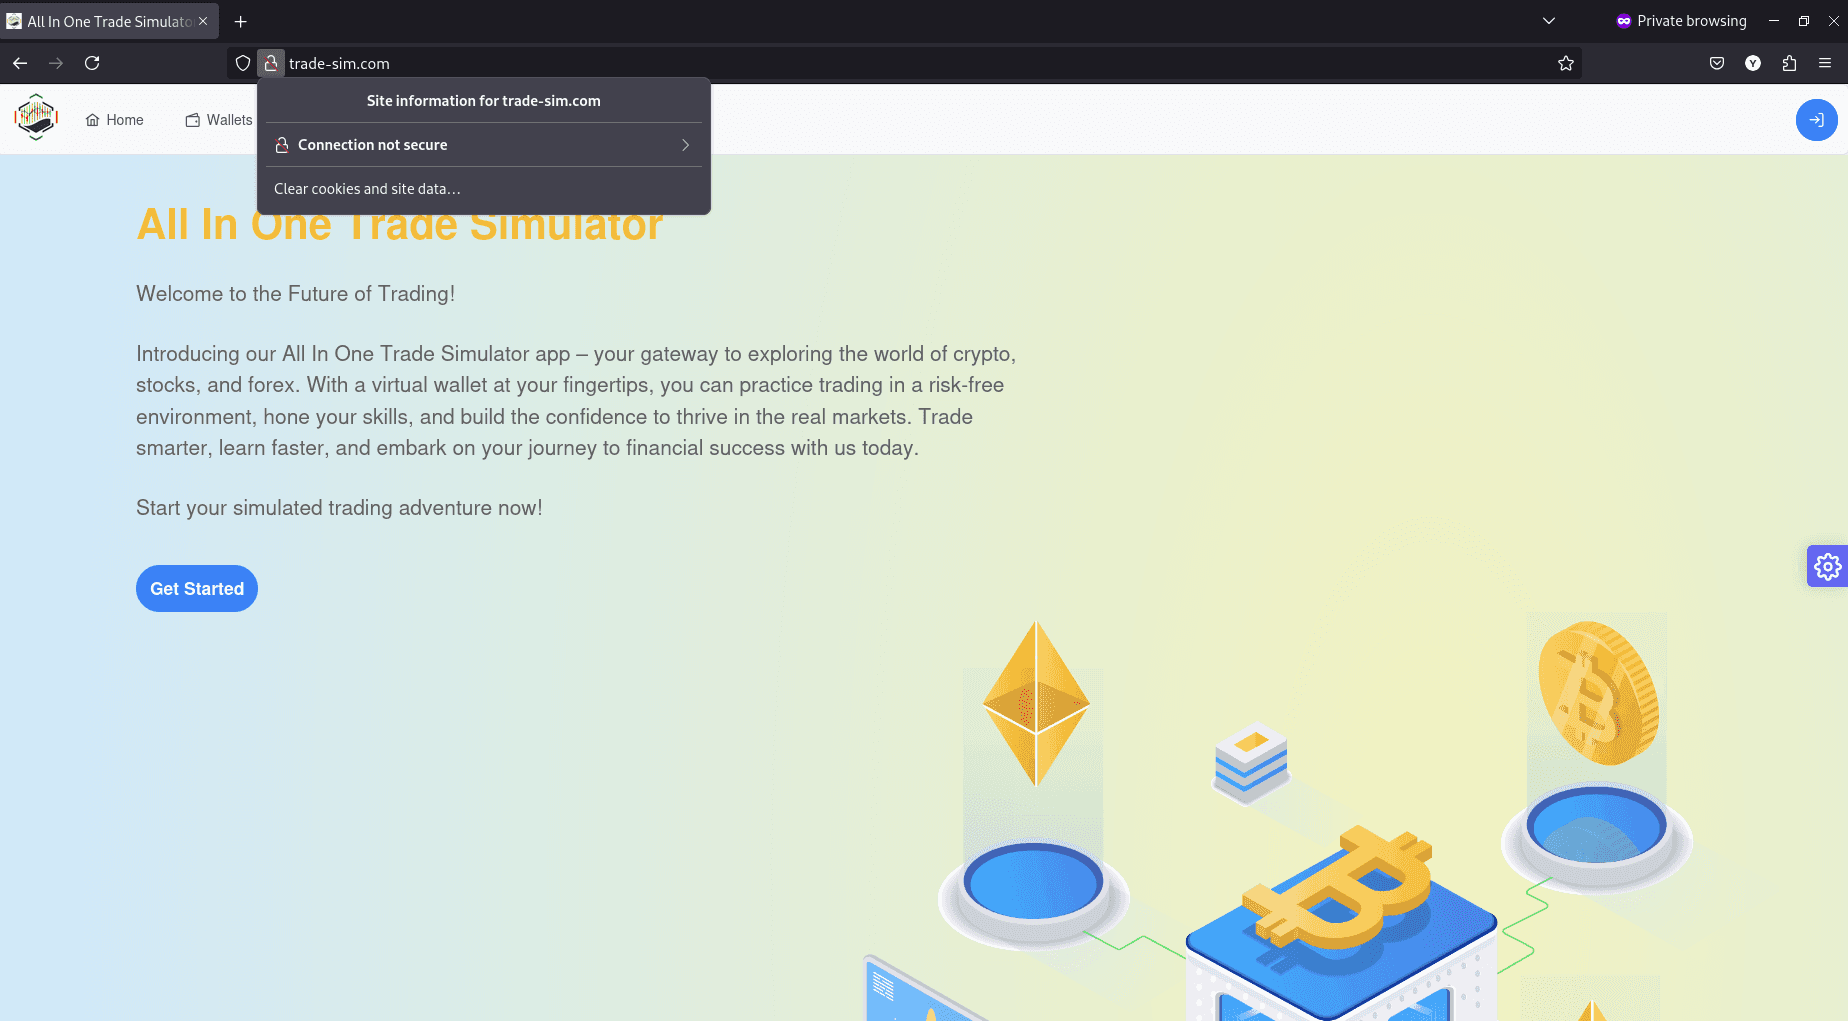
Or the following in Firefox:
Prerequisites
Map the Host to the Nginx Service IP
For this to work you need to map the host trade-sim.com to the nginx docker service ip.
To do this you need first to get the ip of the nginx service by running the following command:
docker inspect nginx | grep "IPAddress"The result should look like this:
"SecondaryIPAddresses": null,
"IPAddress": "",
        "IPAddress": "192.168.0.12",
In this case, the ip of the nginx service is 192.168.0.12
Then you need to map the host trade-sim.com to the ip of the nginx service.
You can do this by adding the following line to your /etc/hosts file (you need to have root access with sudo to do this):
192.168.0.12 trade-sim.com This is curcial since we don't have a DNS record for
trade-sim.comso the browser will look for/etc/hoststo resolve the domain name to the ip of the nginx service.
Nginx Configuration
When working witn nginx in local development, your default.conf file should look like this:
server {
  listen       80;
  listen  [::]:80;
  server_name trade-sim.com;

  location / {
    ....
  }
}
This is the default configuration for a local development environment with HTTP protocol on port 80.We will modify this configuration to include HTTPS at port 443.
The end goal is to have a configuration that looks like this:
server {
  listen 443 ssl;
  server_name trade-sim.com;

  ssl_certificate     /etc/letsencrypt/live/trade-sim.com/trade-sim.com.fullchain.pem;

  ssl_certificate_key /etc/letsencrypt/live/trade-sim.com/trade-sim.com.key;

  location / {
    ....
  }
}
Where trade-sim.com.fullchain.pem and trade-sim.com.key are the SSL certificate and key files respectively that we will generate with our local Certificate Authority (CA).
Step 1: Create a Root Certificate Authority
In the next steps, we will need OpenSSL to create a root certificate authority (CA) and local service certificate
To create a local CA, follow these steps:
Create a directory for your certificates and navigate to it.This is not a requirement, but it makes it easier to find the keys later.
mkdir ~/certs
cd ~/certs
1- Generate a private key myCA.key to act as the root CA:
openssl genrsa -des3 -out myCA.key 2048You will be prompted to enter a passphrase to secure the key. Make sure to remember this passphrase, as you will need it later.
The output should look like this:
Generating RSA private key, 2048 bit long modulus
..........................................................................+++
e is 65537 (0x10001)
Enter pass phrase for myCA.key:
Verifying - Enter pass phrase for myCA.key:
2- Generate a root certificate myCA.pem using the private key:
openssl req -x509 -new -nodes -key myCA.key -sha256 -days 1825 -out myCA.pemYou will be prompted for the passphrase of the private key you just chose and a bunch of questions. You can leave these questions blank if you wish.
I suggest making the Common Name something that you’ll recognize as your root certificate in a list of other certificates. That’s really the only thing that matters.
The output should look like this:
Enter pass phrase for myCA.key:
You are about to be asked to enter information that will be incorporated
into your certificate request.
What you are about to enter is what is called a Distinguished Name or a DN.
There are quite a few fields but you can leave some blank
For some fields there will be a default value,
If you enter '.', the field will be left blank.
-----
Country Name (2 letter code) [AU]:TN
State or Province Name (full name) [Some-State]:
Locality Name (eg, city) []:
Organization Name (eg, company) [Internet Widgits Pty Ltd]
Organizational Unit Name (eg, section) []:
Common Name (e.g. server FQDN or YOUR name) []:LocalRootCA
Email Address []: any@gmail.com
For this guide, the root certificate Common Name is set to
LocalRootCA
Step 2: Adding the Root Certificate to Linux
For Linux systems, add the root certificate to the trusted CA list:
1 - Copy the root certificate to the trusted directory:
sudo cp ~/certs/myCA.pem /usr/local/share/ca-certificates/myCA.crt2 - Update the trusted certificates:
sudo update-ca-certificates3 - Verify that the root certificate has been added to the trusted list:
awk -v cmd='openssl x509 -noout -subject' '/BEGIN/{close(cmd)};{print | cmd}' < /etc/ssl/certs/ca-certificates.crt | grep LocalRootCAOutput should resemble:
subject=C = TN, ST = Some-State, L = NB, O = Internet Widgits Pty Ltd, CN = LocalRootCA, emailAddress = any@gmail.comStep 3: Generate CA-Signed Certificates for Your Dev Sites
Now that you have a root certificate authority, you can use it to sign certificates for your local development sites.
1 - Generate a private key for the domain:
openssl genrsa -out trade-sim.com.key 20482 - Create a Certificate Signing Request (CSR):
openssl req -new -key trade-sim.com.key -out trade-sim.com.csrYou’ll get all the same questions as you did above and, again, your answers don’t matter. The only thing that matters is the Common Name. This should be the domain name you’re creating the certificate for.In this case, it is trade-sim.com.
3 - Create a configuration file trade-sim.com.ext to specify the Subject Alternative Name (SAN) for the certificate:
authorityKeyIdentifier=keyid,issuer
basicConstraints=CA:FALSE
keyUsage = digitalSignature, nonRepudiation, keyEncipherment, dataEncipherment
subjectAltName = @alt_names

[alt_names]
DNS.1 = trade-sim.com
4 - Generate the signed certificate:
openssl x509 -req -in trade-sim.com.csr -CA ~/certs/myCA.pem -CAkey ~/certs/myCA.key \
-CAcreateserial -out trade-sim.com.crt -days 825 -sha256 -extfile trade-sim.com.ext
Here we are using the root certificate myCA.pem and private key myCA.key to sign the certificate for trade-sim.com.
Step 4: Configure Nginx to Use the SSL Certificate
Now that you have the signed certificate, you can configure Nginx to use it.
1 - Create a fullchain certificate file
Before you can use the certificate, you need to combine the domain server certificate trade-sim.com.crt and the root certificate myCA.pem into a single file trade-sim.com.fullchain.pem. This is because Nginx requires the certificate and the key to be in the same file.
Ensure your full chain file is ordered correctly:
1-Server Certificate: Your site's certificate (trade-sim.com.crt).
2-Root CA Certificate: Your local CA root certificate (myCA.pem).
It will look like this:
-----BEGIN CERTIFICATE-----
(Your Primary SSL certificate: trade-sim.com.crt)
-----END CERTIFICATE-----
-----BEGIN CERTIFICATE-----
(Your root certificate: myCA.pem)
-----END CERTIFICATE-----
2 - Map the certificate and key to the Nginx docker service volume
In your docker-compose.yml file, add the following volumes to the Nginx service:
volumes:
  - path-to-key-file/trade-sim.com.key:/etc/letsencrypt/live/trade-sim.com/trade-sim.com.key
  - path-to-cert-file/trade-sim.com.fullchain.pem:/etc/letsencrypt/live/trade-sim.com/trade-sim.com.fullchain.pem
3 - Update the Nginx configuration to use the SSL certificate:
server {
  listen 443 ssl;
  server_name trade-sim.com;

  ssl_certificate     /etc/letsencrypt/live/trade-sim.com/trade-sim.com.fullchain.pem;

  ssl_certificate_key /etc/letsencrypt/live/trade-sim.com/trade-sim.com.key;

  location / {
    ....
  }
}
Step 5: Trust the Local Certificate Authority in Browsers
To avoid privacy errors in browsers, you need to trust the local CA in your browser.
Trust the Local CA in Chrome
1 - Open Chrome’s Certificate Manager:
- Go to chrome://settings/.
- Search for Manage Certificates.
2 - Import the Root CA Certificate
- Go to the Authorities tab.
- Click Import and select your myCA.pem file.
- Choose to trust it for websites.
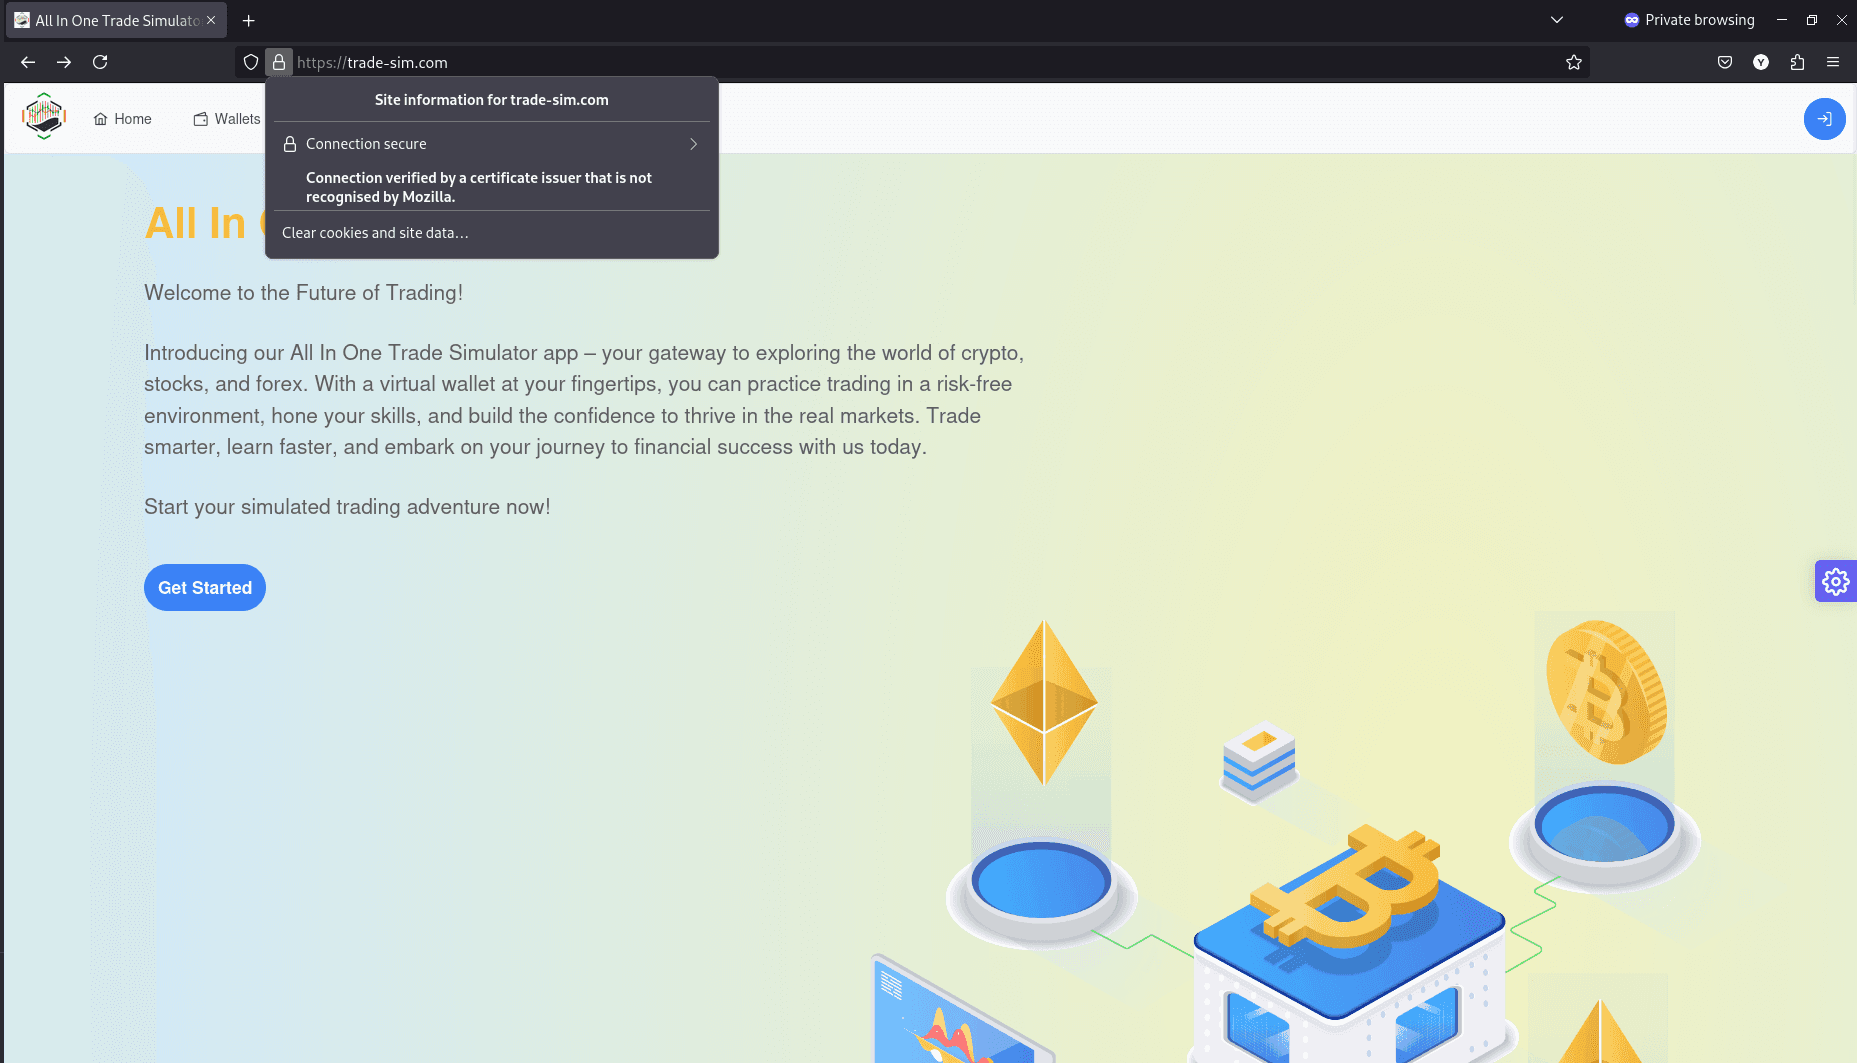
Now when you visit your local development site https://trade-sim.com, you should see that your site is secure.

Trust the Local CA in Firefox
1 - Open Firefox Manager
- Go to Preferences > Privacy & Security > Certificates > View Certificates
2 - Import the Root CA Certificate
- Go to the Authorities tab.
- Click Import and select your myCA.pem file.
- Check the box for "Trust this CA to identify websites."
Similar to Chrome, you should now see that your site is secure in Firefox.
Troubleshooting Common Issues
Error: Error: Self-Signed Certificate in Certificate Chain
Some services (like Node.js or Python-based frameworks) might not automatically trust your local CA.
To fix this, you need to add the root certificate to the trusted certificates in your programming language.
Node.js (Express, NestJS, NextJS etc.)
Node.js does not automatically trust custom or self-signed CA certificates. You need to configure it to trust your local CA.
Add the following to your docker-compose services that use Node.js:
environment:
  - NODE_EXTRA_CA_CERTS=/usr/local/share/ca-certificates/myCA.pem
volumes:
  - path-to-ca-root-file/myCA.pem:/usr/local/share/ca-certificates/myCA.pem
Here we set the NODE_EXTRA_CA_CERTS environment variable to point to your CA certificate. This tells Node.js to include the specified CA certificate in its trust store.
Besides, we map the CA certificate to the /usr/local/share/ca-certificates/ directory in the container.
Then, restart the service:
docker-compose restart service-namePython (Django, FastAPI etc.)
In Python, The error will look like this:
requests.exceptions.SSLError: HTTPSConnectionPool(host='trade-sim.com', port=443): Max retries exceeded with url: / (Caused by SSLError(SSLCertVerificationError(1, '[SSL: CERTIFICATE_VERIFY_FAILED] certificate verify failed: self-signed certificate in certificate chain (_ssl.c:1006)')))Just like Node.js, Python does not trust custom or self-signed CA certificates by default. You need to configure it to trust your local CA.
Add the following to your docker-compose services that use Python:
environment:
  - REQUESTS_CA_BUNDLE=/usr/local/share/ca-certificates/myCA.pem
volumes:
  - path-to-ca-root-file/myCA.pem:/usr/local/share/ca-certificates/myCA.pem
Here we set the REQUESTS_CA_BUNDLE environment variable to point to your CA certificate. This tells Python to include the specified CA certificate in its trust store.
Besides, like node services we map the CA certificate to the /usr/local/share/ca-certificates/ directory in the container.
Then, restart the service:
docker-compose restart service-nameConclusion
In this guide, you learned how to create your own SSL Certificate Authority (CA), use it to issue certificates for local development sites and use HTTPS on your local sites.
This approach is suitable for local development environments and ensure that your local environment closely mirrors production.
Hopefully, this will eliminate the dreaded “Your connection is not private” message for you on your local development websites.