
Setting Up a WebSocket Server and Client: A Practical Guide
Table Of Content
- Setting Up a basic WebSocket Server and Client with Python
- WebSocket Server
- WebSocket Client
- Results
- Setting Up a WebSocket Server with Python and Client with HTML/JS
- WebSocket Server (Python)
- Understanding asyncio and websockets
- WebSocket Client (HTML/JS)
- Results
- Implementing Websocket for target User
- WebSocket Server (Python)
- Send Message Script (Backend)
- WebSocket Client (HTML/JS)
- Results
- Conclusion
WebSocket technology has revolutionized real-time web applications by enabling bi-directional communication between servers and clients with low overhead and minimal latency. This practical guide explores the setup and integration of WebSocket servers and clients using Python for the server side and HTML/JS for the client side. Whether you're building a chat application, live data dashboard, or multiplayer game, mastering WebSocket implementation is crucial for creating responsive and interactive web experiences. Follow along to learn how to establish a robust WebSocket connection and harness its power in your web projects.
Note: This guide assumes basic knowledge of Python, HTML, and JavaScript. Familiarity with asynchronous programming concepts and web development tools is recommended for a better understanding of the WebSocket setup process.
Setting Up a basic WebSocket Server and Client with Python
WebSocket Server
Below is a Python script demonstrating how to set up a basic WebSocket server using the socket module.
import socket

HOST = "127.0.0.1"
PORT = 12345

with socket.socket(socket.AF_INET, socket.SOCK_STREAM) as s:
    s.bind((HOST, PORT))
    s.listen()
    print(f"Server listening on {HOST}:{PORT}")
    conn, addr = s.accept()
    with conn:
        print(f"Connected by {addr}")
        while True:
            #Receive data from the client
            data = conn.recv(1024)
            print(f"Received {data.decode()}")
            if not data:
                break
            #Send data to the client
            print("Sending message to client...")
            conn.sendall(b" - Hello from server!")
Explanation:
1-Socket Creation and Binding:
socket.socket(socket.AF_INET, socket.SOCK_STREAM): Creates a new socket using IPv4 and TCP protocol (SOCK_STREAM).s.bind((HOST, PORT)): Binds the socket to the specified IP address (HOST) and port number (PORT).
2- Listening for Connections:
s.listen(): Enables the server to accept connections.
3- Accepting Connections:
s.accept(): Accepts an incoming connection request from a client. Returns a new socket (conn) and the address (addr) of the client.
4- Data Exchange:
- Inside the while True loop, the server receives data from the client using
conn.recv(1024), where1024is the buffer size in bytes. - It decodes the received data (
data.decode()) and prints it. - If no data is received (
if not data), the loop breaks. - It sends a response back to the client using
conn.sendall(b" - Hello from server!"), sending a simple message back to the client.
WebSocket Client
Below is a Python script demonstrating how to set up a basic WebSocket client using the socket module.
import socket
import time

HOST = "127.0.0.1"
PORT = 12345

with socket.socket(socket.AF_INET, socket.SOCK_STREAM) as s:
    s.connect((HOST, PORT))
    while True:
        #Send data to the server
        print("Sending message to server...")
        s.sendall(b"Hello from client!")
        data = s.recv(1024)
        #Receive data from the server
        print(f"Received {data!r}")
        time.sleep(2)
Explanation:
1- Socket Creation and Connection:
socket.socket(socket.AF_INET, socket.SOCK_STREAM): Creates a new socket using IPv4 and TCP protocol (SOCK_STREAM).s.connect((HOST, PORT)): Initiates a connection to the server specified byHOST(IP address) andPORT(port number).
2- Data Exchange:
- Inside the while True loop, the client sends data to the server using
s.sendall(b"Hello from client!"), sending a simple message as bytes to the server. - It then receives data from the server using
s.recv(1024), where1024is the buffer size in bytes. - It prints the received data (
data) in a formatted representation ({data!r}).
3- Delay Between Messages:
time.sleep(2): Pauses the execution of the client script for 2 seconds before sending the next message to the server. This simulates a delay between consecutive interactions with the server.
Results
After running the WebSocket server script, you should see the following output:
Server listening on 127.0.0.1:12345
Connected by ('127.0.0.1', 56556)
Received Hello from client!
Sending message to client...
Received Hello from client!
Sending message to client...
Received Hello from client!
Similarly, after running the WebSocket client script, you should see the following output:
Sending message to server...
Received b' - Hello from server!'
Sending message to server...
Received b' - Hello from server!'
Sending message to server...
Received b' - Hello from server!'
Setting Up a WebSocket Server with Python and Client with HTML/JS
WebSocket Server (Python)
After viewing the basic WebSocket server implementation, let's explore a more advanced example using the websockets library, which simplifies WebSocket server development in Python.
To install the websockets library, run the following command:
pip install websocketsWe will need also need asyncio library to handle asynchronous operations.
Understanding asyncio and websockets
-
asyncio: Python's asyncio module provides infrastructure for writing asynchronous programs using coroutines, making it easier to write concurrent code that is both efficient and readable. It allows tasks to be scheduled cooperatively, ensuring that the program can handle many I/O-bound operations concurrently.
-
websockets: The websockets library builds upon asyncio to facilitate WebSocket communications. It abstracts away the complexities of the WebSocket protocol, allowing developers to focus on application logic rather than low-level protocol details. websockets supports both server-side and client-side WebSocket implementations.
Below is a Python script demonstrating how to implement a basic WebSocket server using asyncio and websockets.
import asyncio
import websockets

class WebSocketServer:
    """
    A WebSocket server class.
    """

    def __init__(self, host="localhost", port=12345):
        self.host = host
        self.port = port

    async def handle_connection(self, websocket):
        """
        Handles incoming connections and messages from clients.
        """
        try:
            while True:
                message = "Message from server"
                await self.send_message(websocket, message)
                #Send a message every 10 seconds
                await asyncio.sleep(10)
        except websockets.exceptions.ConnectionClosedError as e:
            print(f"Connection closed: {e}")

    async def send_message(self, websocket, message):
        """
        Sends a message to the client.
        """
        try:
            print(f"Sending message to client: {message}")
            await websocket.send(f"Received message from server: {message}")
        except websockets.exceptions.ConnectionClosedError as e:
            print(f"Connection closed: {e}")

    async def start(self):
        """
        Starts the WebSocket server.
        """
        async with websockets.serve(self.handle_connection, self.host, self.port):
            print(f"Server listening on ws://{self.host}:{self.port}")
            #Run the server forever
            await asyncio.Future()

if __name__ == "__main__":
    server = WebSocketServer()
    asyncio.run(server.start())
Explanation:
1- WebSocketServer Class: Defines the WebSocket server functionality. It initializes with a host (localhost by default) and a port number (12345 by default).
2- handle_connection Method: Handles each WebSocket connection. It continuously sends a predefined message to clients every 10 seconds using asyncio.sleep.
3- send_message Method: Sends a message to a connected client.
4- start Method: Starts the WebSocket server using websockets.serve. It listens for incoming connections.
5- Main Block: Instantiates WebSocketServer and starts it using asyncio.run.
WebSocket Client (HTML/JS)
Below is an HTML document with embedded JavaScript that demonstrates how to implement a WebSocket client:
<!DOCTYPE html>
<html lang="en">
<head>
    <meta charset="UTF-8">
    <meta name="viewport" content="width=device-width, initial-scale=1.0">
    <title>WebSocket Client</title>
</head>
<body>
    <h1>WebSocket Client</h1>
    <div id="messages"></div>

    <script>
        const socket = new WebSocket('ws://localhost:12345'); // Replace with your server's IP and port

        // Connection opened
        socket.addEventListener('open', function (event) {
            console.log('Connected to WebSocket server');
        });

        // Listen for messages
        socket.addEventListener('message', function (event) {
            console.log('Message from server: ', event.data);
            const messages = document.getElementById('messages');
            const messageElement = document.createElement('div');
            messageElement.textContent = event.data;
            messages.appendChild(messageElement);
        });

        // Error handler
        socket.addEventListener('error', function (event) {
            console.error('WebSocket error:', event);
        });

        // Close handler
        socket.addEventListener('close', function (event) {
            console.log('WebSocket connection closed', event);
        });
    </script>
</body>
</html>
Explanation:
1- WebSocket Connection: The client establishes a WebSocket connection using const socket = new WebSocket('ws://localhost:12345');, where 'ws://localhost:12345' specifies the WebSocket server's URL (replace with your server's IP and port).
2- Event Listeners:
-
open: Listens for the connection open event. When the connection is established, it logs a message to the console.
-
message: Listens for incoming messages from the WebSocket server. When a message arrives, it logs the message to the console and appends it to the div element with id="messages" on the HTML page.
-
error: Listens for any WebSocket errors and logs them to the console.
-
close: Listens for the WebSocket connection close event and logs it to the console.
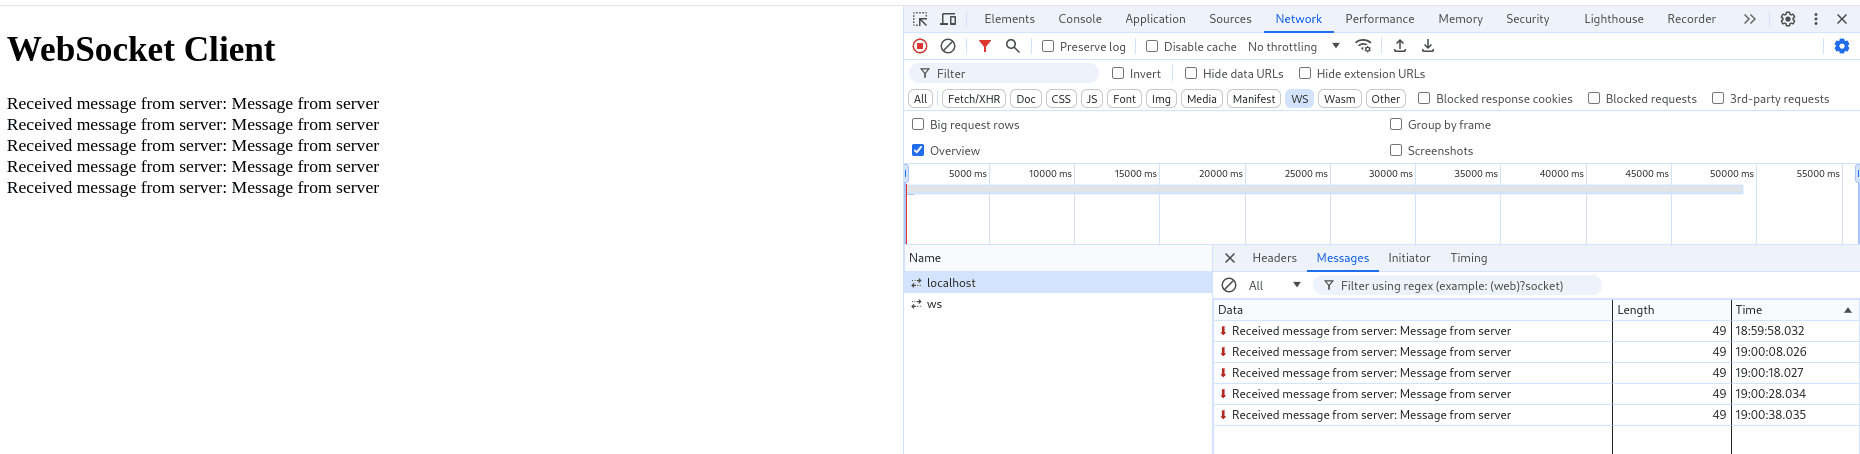
Results
After running the WebSocket server script, you should see the following output:
Server listening on ws://localhost:12345
Sending message to client: Message from server
Sending message to client: Message from server
Sending message to client: Message from server
Sending message to client: Message from server
Sending message to client: Message from server
When you open the HTML file in a browser, you should see the WebSocket client interface displaying messages received from the server every 10 seconds.
Implementing Websocket for target User
In the previous section, we set up a foundational WebSocket server in Python and a client in HTML/JavaScript. With these basics in place, the next step is to implement WebSocket for real cases scenarios.
Whether you're building a chat application, a live data dashboard, or a multiplayer game, WebSocket can be tailored to meet specific user requirements.
In this section, we will delve into how to effectively implement WebSocket for specific user scenarios. We will add to the existing WebSocket server and client setup. We will also add a third component
send_messagethat play the role of middleware. It will receive messages from the server and send it to the client.
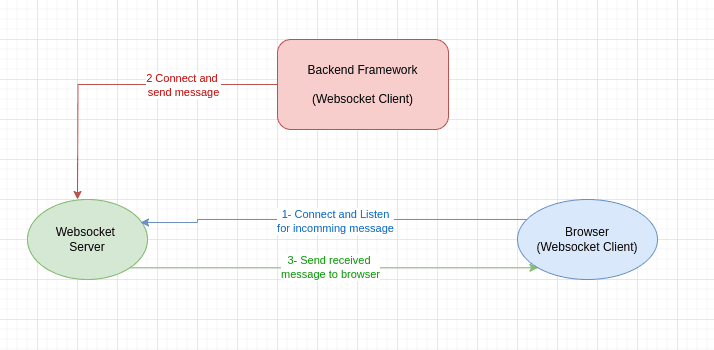
This setup is practical for using websocket in an api endpoint or a background task (with Celery). In this case the websocket server is running in background with a backend framework like Django, NestJS, Laravel, etc.
The client which will be the browser will connect to the server and listen for uncomming message. As for the backend framework, it will play the role of middleware as a websocket client.
Contrary to the browser, the backend will not listen for incoming messages.Instead it will connect to the websocket server and send messages to the server wich will forward it the browser.
This usually done inside an api endpoint route or a celery background task depending on the use case.
WebSocket Server (Python)
To target a specific user, the browser will connect to the WebSocket server with url that have email as query parameter.
The url will look like this ws://localhost:12345?email=${email}.
The server will extract the email from the query parameter and send message to the client with that email.
As for the backend, we will simulate it with send_message.py script and it will use a different query parameter source for email so the server can differentiate between messages coming from the browser and the backend.
The url will look like this ws://localhost:12345?source=${email}.
The WebSocket server script will ubdated with:
1- Class User to store the email of the user:
class User:
    def __init__(self, email, websocket):
        self.email = email
        self.websocket = websocket
2- A list of users to store the connected users:
class WebSocketServer:
    def __init__(self, host="localhost", port=8765):
        self.host = host
        self.port = port
        self.users = {}  # Dictionary to store users and their connections
3- Methods to extract the email and source from the query parameter:
    def _get_email_from_path(self, path):
        """
        Extracts the email parameter from the WebSocket connection path.
        """
        try:
            query_params = path.split("?")[1]
            email = query_params.split("email=")[1].split("&")[0]
            return email
        except IndexError:
            return None

    def _get_source_from_path(self, path):
        """
        Extracts the source parameter from the WebSocket connection path.
        """
        try:
            query_params = path.split("?")[1]
            source = query_params.split("source=")[1].split("&")[0]
            return source
        except IndexError:
            return None
4 - handle_connection Method will add the user to the list of users if connection is from browser. Where in case it comes from the backends it will send the message to the target user.
    async def handle_connection(self, websocket, path):
        """
        Handles incoming connections and messages from clients.
        """
        email = self._get_email_from_path(path)
        source = self._get_source_from_path(path)

        if email:
            self.users[email] = User(email, websocket)
            print(f"Users are {self.users}")
        elif source:
            print(f"Source is {source}")
        else:
            await websocket.send("Invalid connection: Email required.")
            await websocket.wait_closed()
            return

        try:
            async for message in websocket:
                print(f"Received message from {email if email else source}: {message}")
                if source:
                    #Send Incoming message from other backends scripts to all connected js clients
                    await asyncio.sleep(2)
                    await self.send_message(source, message)
        finally:
            #Remove user on disconnect
            self.users.pop(email, None)
5- send_message Method will send the message to the target user:
    async def send_message(self, email, message):
        """
        Sends a message to a specific user identified by email.
        """
        if email in self.users:
            print(f"User with email '{email}' found.")
            try:
                await self.users[email].websocket.send(message)
                print(f"Message sent successfully.")
            except websockets.ConnectionClosed as e:
                # Handle connection closed gracefully (remove user)
                print(f"Connection closed for user with email '{email}': {e}")
                self.users.pop(email, None)
        else:
            print(f"User with email '{email}' not found.")
Below is the fully updated WebSocket server script:
import asyncio
import websockets

class User:
    def __init__(self, email, websocket):
        self.email = email
        self.websocket = websocket

class WebSocketServer:
    """
    A WebSocket server class that allows sending messages to specific users.
    """

    def __init__(self, host="localhost", port=12345):
        self.host = host
        self.port = port
        self.users = {}  # Dictionary to store users and their connections

    async def handle_connection(self, websocket, path):
        """
        Handles incoming connections and messages from clients.
        """
        email = self._get_email_from_path(path)
        source = self._get_source_from_path(path)

        if email:
            self.users[email] = User(email, websocket)
            print(f"Users are {self.users}")
        elif source:
            print(f"Source is {source}")
        else:
            await websocket.send("Invalid connection: Email required.")
            await websocket.wait_closed()
            return

        try:
            async for message in websocket:
                print(f"Received message from {email if email else source}: {message}")
                if source:
                    #Send Incoming message from other backends scripts to all connected js clients
                    await asyncio.sleep(5)
                    await self.send_message(source, message)

        finally:
            #Remove user on disconnect
            self.users.pop(email, None)

    def _get_email_from_path(self, path):
        """
        Extracts the email parameter from the WebSocket connection path.
        """
        try:
            query_params = path.split("?")[1]
            email = query_params.split("email=")[1].split("&")[0]
            return email
        except IndexError:
            return None

    def _get_source_from_path(self, path):
        """
        Extracts the source parameter from the WebSocket connection path.
        """
        try:
            query_params = path.split("?")[1]
            source = query_params.split("source=")[1].split("&")[0]
            return source
        except IndexError:
            return None

    async def send_message(self, email, message):
        """
        Sends a message to a specific user identified by email.
        """
        if email in self.users:
            print(f"User with email '{email}' found.")
            try:
                await self.users[email].websocket.send(message)
                print(f"Message sent successfully.")
            except websockets.ConnectionClosed as e:
                # Handle connection closed gracefully (remove user)
                print(f"Connection closed for user with email '{email}': {e}")
                self.users.pop(email, None)
        else:
            print(f"User with email '{email}' not found.")

    async def start(self):
        """
        Starts the WebSocket server.
        """
        async with websockets.serve(self.handle_connection, self.host, self.port):
            print(f"Server listening on ws://{self.host}:{self.port}")
            await asyncio.Future()

if __name__ == "__main__":
    server = WebSocketServer()
    asyncio.run(server.start())
Send Message Script (Backend)
Below is a Python script that simulates the backend sending messages to the WebSocket server:
import asyncio
import websockets

async def send_message_to_client(email, message, server_url):
    """
    Sends a message to a specific user on the WebSocket server.
    """
    async with websockets.connect(server_url) as websocket:
        print(f"Sending message to {email}: {message}")
        await websocket.send(message)


if __name__ == "__main__":
    email = "user@domain.com"
    server_url = f"ws://localhost:12345?source={email}"
    message = f"This is a message triggered from another script to user with email {email}"

    asyncio.run(send_message_to_client(email, message, server_url))
WebSocket Client (HTML/JS)
The WebSocket client script in the browser remains the same as the previous example. The only change is the URL used to connect to the WebSocket server, which now includes the email query parameter.
const socket = new WebSocket('ws://localhost:12345?email=user@domain.com');A real-world scenario would involve a react notification component inside a navbar. It will listen for incoming notifications messages for connected user. And when a notification is received, the notification number will increase by 1 and the notification bell will have a ping effect to alert the user.
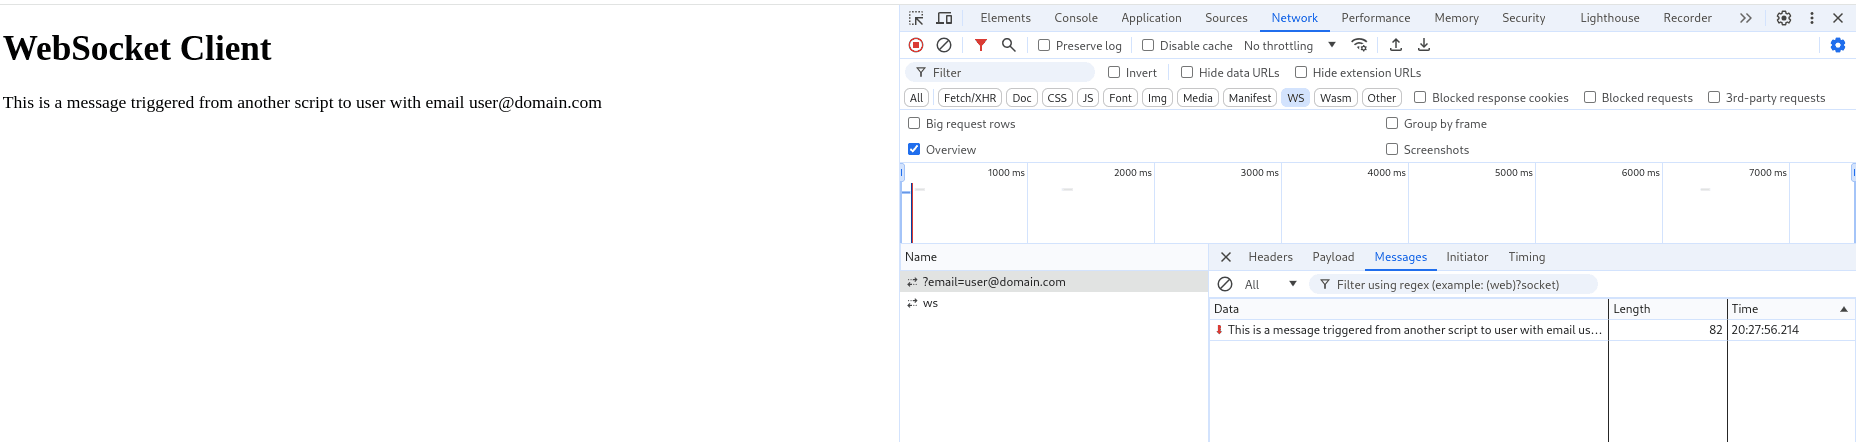
Results
After running the WebSocket server script, you should see the following output:
Server listening on ws://localhost:12345
Users are {'user@domain.com': <__main__.User object at 0x7f247f4c9010>}
Source is user@domain.com
Received message from user@domain.com: This is a message triggered from another script to user with email user@domain.com
User with email 'user@domain.com' found.
Message sent successfully.
When you run the send_message.py script, you should see the following output:
Sending message to user@domain.com: This is a message triggered from another script to user with email user@domain.comThe WebSocket server will send the message to the browser WebSocket client connected with the email user@domain.com.
Conclusion
In this guide, we explored the setup and integration of WebSocket servers and clients using Python for the server side and HTML/JS for the client side. We started with a basic WebSocket server and client implementation and gradually progressed to more advanced scenarios, such as targeting specific users with WebSocket messages.
Keep in mind that WebSocket technology is versatile and can be adapted to various use cases, including chat applications, real-time data visualization, and multiplayer games. By mastering WebSocket implementation, you can create responsive and interactive web experiences that engage users and enhance the overall functionality of your web applications.
I hope this guide has provided you with valuable insights into setting up WebSocket servers and clients and has equipped you with the knowledge to leverage WebSocket technology effectively in your projects. Feel free to experiment with different WebSocket configurations and explore additional features to enhance your web applications further.